Safe and automation friendly canary deployments with Helm
Canary deployments are a very effective way of testing new code on a subset of a user base. They significantly reduces the blast radius of a deployment that may be tricky to roll out by only exposing it to a subset of traffic. This post will dive into how to achieve this within Kubernetes but also in a deployment automation friendly way. This post assumes some knowledge of Helm charts and Kubernetes resources.
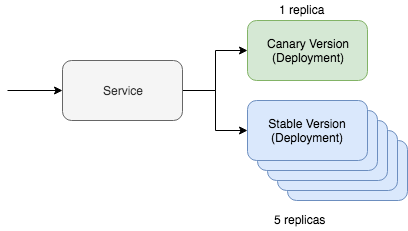
A simple canary deployment with Kubernetes involves two key resources: The service and the deployment resource. A canary deployment works by having a single service resource with two different deployment resources serving this traffic. One of the deployment resources will be a canary version while the other will be the stable version. We can keep the replica count of the canary version lower to only serve a smaller percentage of the traffic. If you like to think in Yaml, it roughly looks like the below Kubernetes resources:
kind: Deployment
metadata:
  name: app-canary
  labels:
    app: app
spec:
  replicas: 1
  ...
    image: myapp:canary
---
kind: Deployment
metadata:
  name: app
  labels:
    app: app
spec:
  replicas: 5
  ...
    image: myapp:stable
---
kind: Service
selector:
  app: app # Selector will route traffic to both deployments.
This is simple to imagine just using kubectl, there is even a great guide on this in the Kubernetes documentation. The question for this post is how we’re going to automate this and additionally how to do this with Helm.
Automating the canary
First of all, we need a basic Helm chart that holds the resources that we discussed above. The Helm chart should look something like this:
~/charts/app
├── Chart.yaml
├── README.md
├── templates
│   ├── NOTES.txt
│   ├── _helpers.tpl
│   ├── deployment.yaml
│   └── service.yaml
└── values.yaml
The core concept with Helm is to manage multiple releases. A stable release is our main release track with the stable version of our code. We can then deploy a canary Helm release with our canary code. The piece that joins these is that the stable release must route traffic to the canary release. We’re going to manage this by using a specific selector on the service:
selector:
  app.kubernetes.io/name: myapp
Our deployment resources, both canary and stable, will specify this label on the pods. As long as we set this up correctly when we deploy the canary version of our Helm chart we will see that traffic will be routed to the pods that are deployed.
Let’s release the stable version of our chart. This will look like the following command:
helm upgrade
  --install myapp \
  --namespace default \
  --set app.name=myapp \      # Goes into app.kubernetes.io/name
  --set app.version=v1 \      # Goes into app.kubernetes.io/version
  --set image.tag=stable \
  --set replicaCount=5
Now let’s test out our new canary. To roll out a canary deployment we only need to differ two things. The release name needs to be different so that we don’t actually end up just upgrading our current stable release. The version and image tag needs to also differ so that we’re deploying different code and we can identify this code difference in the deployment resource labels.
helm upgrade
  --install **myapp-canary** \
  --namespace default \
  --set app.name=myapp \      # Goes into app.kubernetes.io/name
  --set **app.version=v2** \      # Goes into app.kubernetes.io/version
  --set **image.tag=canary** \
  --set replicaCount=1
That’s it! If you ping the service you should be able to see the canary application being routed traffic only part of the time.
If you are looking for deployment automation that wraps this logic up take a look at Deliverybot and specifically the Helm GitHub automation. The chart used to test and implement these ideas is located at github.com/deliverybot/helm/charts. This was a theoretical overview on how to do automated canary deployments but these tools bring that into practice with examples and concrete concepts.